Web Compression with Gzip and Brotli: Are You Doing It Right?
In the broadest sense, this involves processing computer data to shrink its size while retaining the information contained within. Here, we focus on lossless compression, which conserves data volume when downloading text files like CSS or JS from a server to a browser.
We know two main methods of compression:
- GZIP is older, more widespread, and less efficient.
- With Brotli, you generally achieve greater savings. It is not as widespread but has full support in browsers.
Why is Compression Important?
Compressing text files on the web is fundamental. We use compression on HTML, JS, and CSS files, as these resources affect the time to first render a page. Logically, we want these resources to be as small as possible.
We also use it for favicons, SVG files, and fonts. However, fonts are a special category; modern ones in WOFF and WOFF2 formats already have compression built-in at the time of file generation. So, if you enable additional compression for fonts in these formats, you'll end up with a file that's more data-heavy than the original. Be wary of that. :)
You can easily determine the compression method using your browser. Open DevTools and the Network tab. In the table, find the content-encoding column.
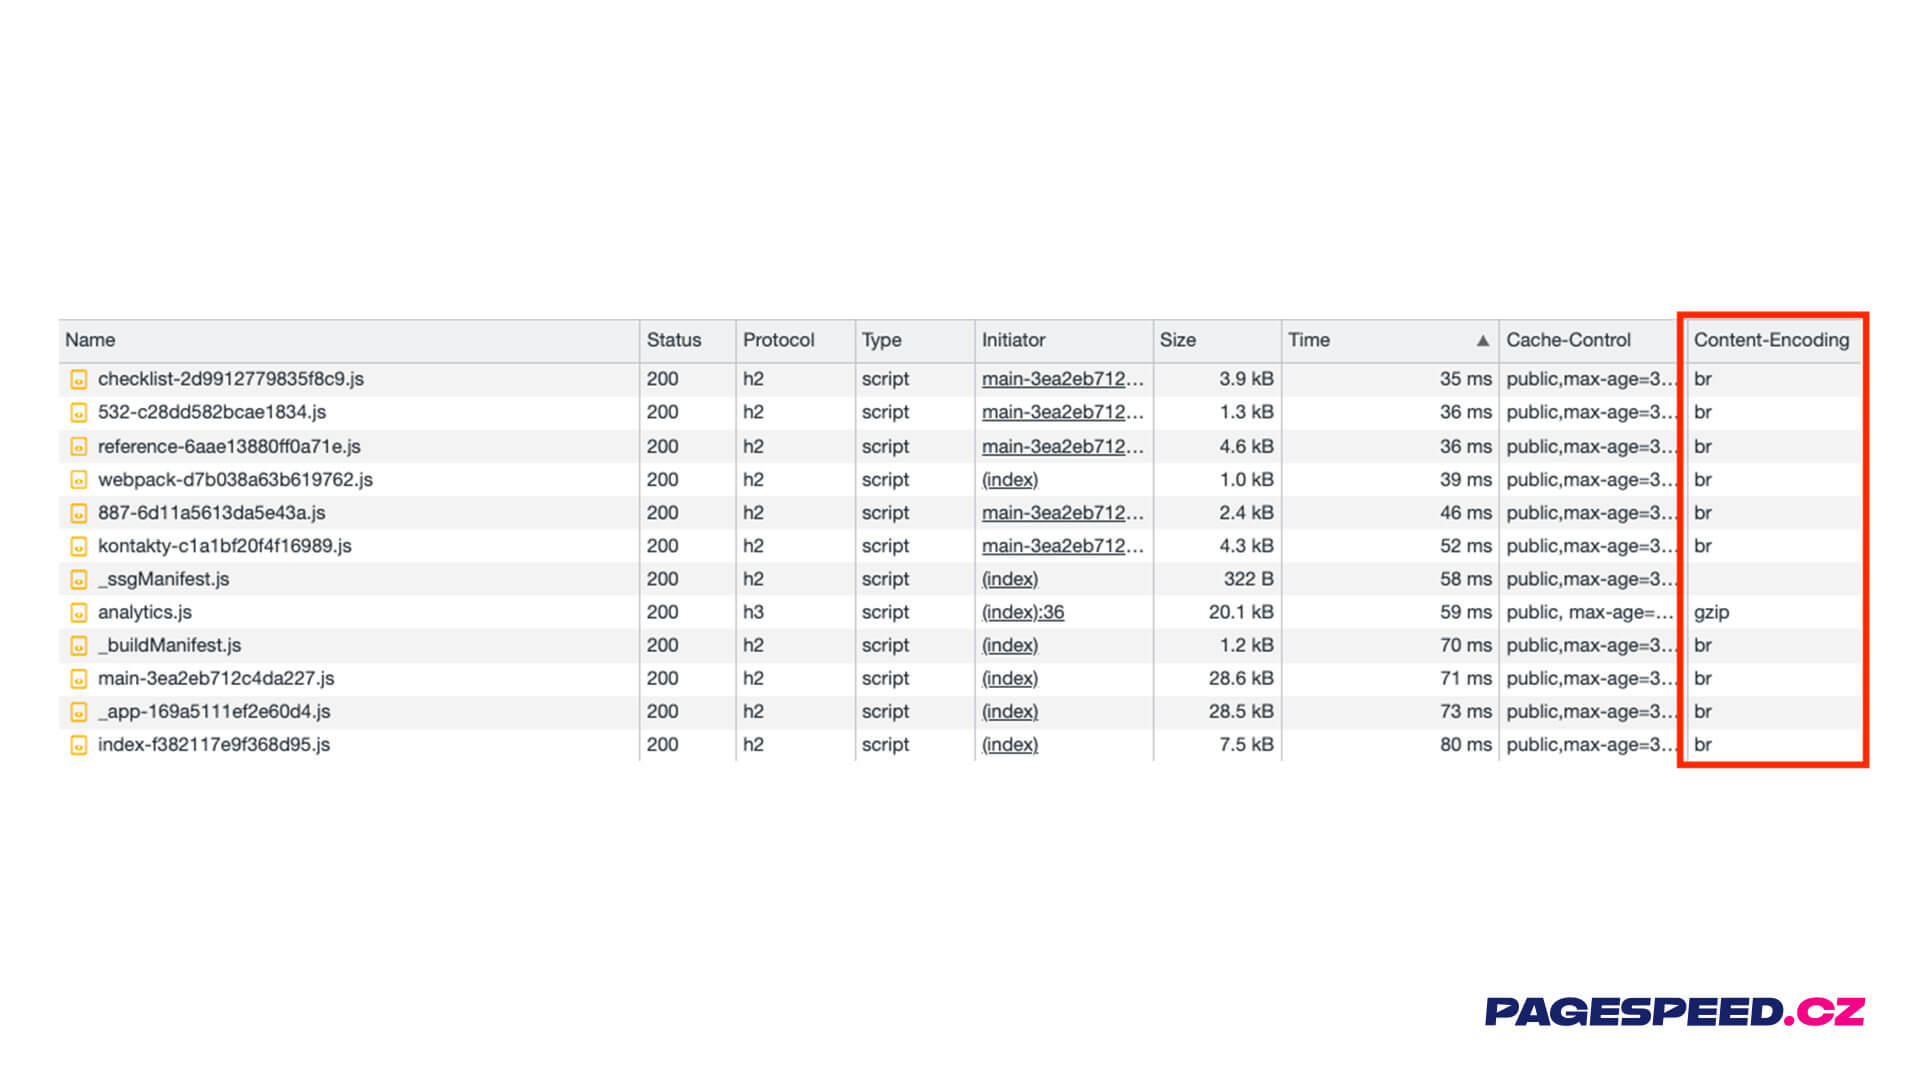 Content-Encoding in DevTools: If nothing's there, it's not good.
Unveiling the Secret of Compression Levels
Setting up Brotli and GZIP, however, is not the end of our task; that would be too simple. Both compression methods allow you to set a compression level. GZIP has a total of 9 levels, while Brotli has 11.
How does such savings from various compression levels manifest on a 55 kB HTML file or 261 kB of jQuery data? Significantly.
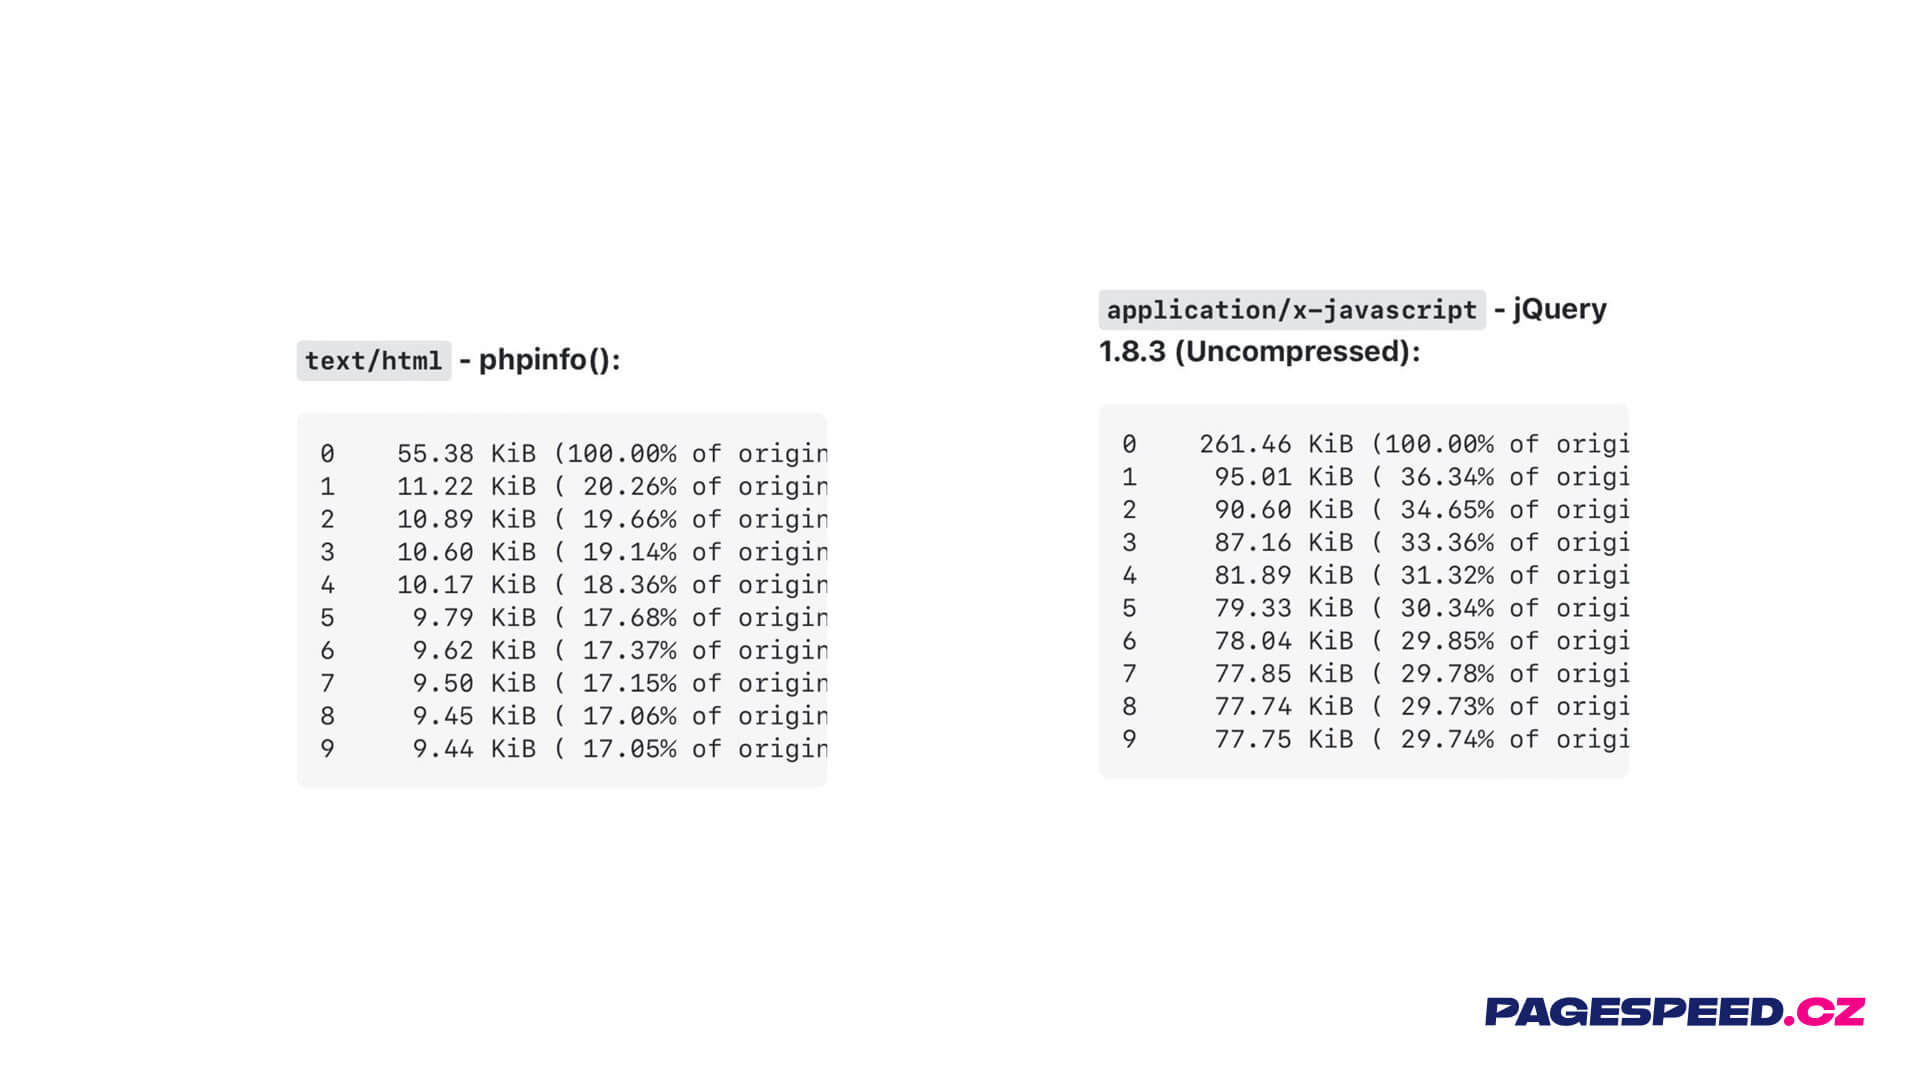 Boring compression? But what if it saves you up to two-thirds of data volume?
We see a significant leap when comparing an uncompressed file to one compressed at level 1. Additional levels save only a few percentage points in data size. So, the question arises: What compression level is the best?
The Hunt for the Ideal Compression Level Setting
When setting the compression level, you must also consider your infrastructure and servers. The truth is, the higher the compression level, the greater the computing power required. A higher compression level requires more time to execute.
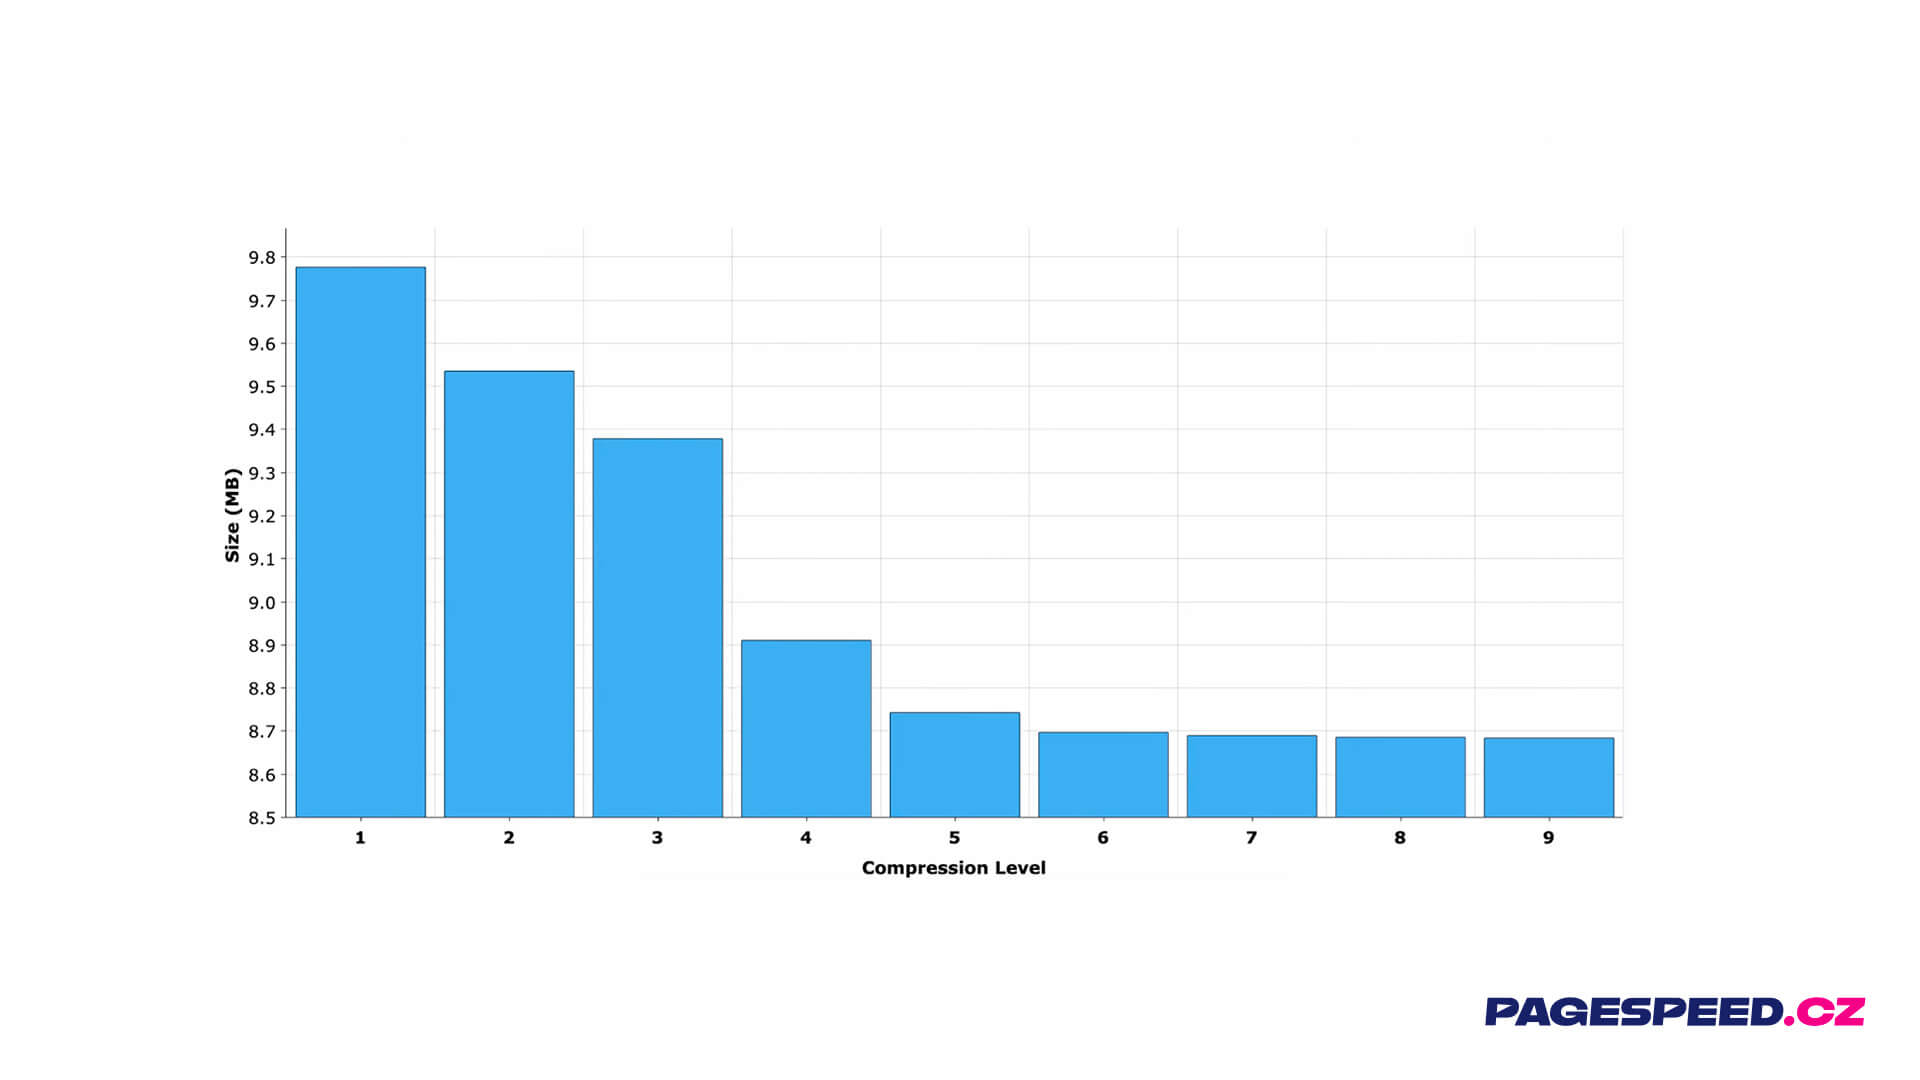 Beyond level six, you don't gain much more.
Generally, at PageSpeed.ONE, we recommend level 6 as the ideal setting. For a more detailed explanation, check out the video What is the GZIP compression level sweet spot?
The Quickest Way to Check Compression Level
You might have stopped here and asked yourself how to determine the compression level on your own website. A useful tool for quick checks is the online tool, where you input a URL. The evaluation will reveal the likely compression level.
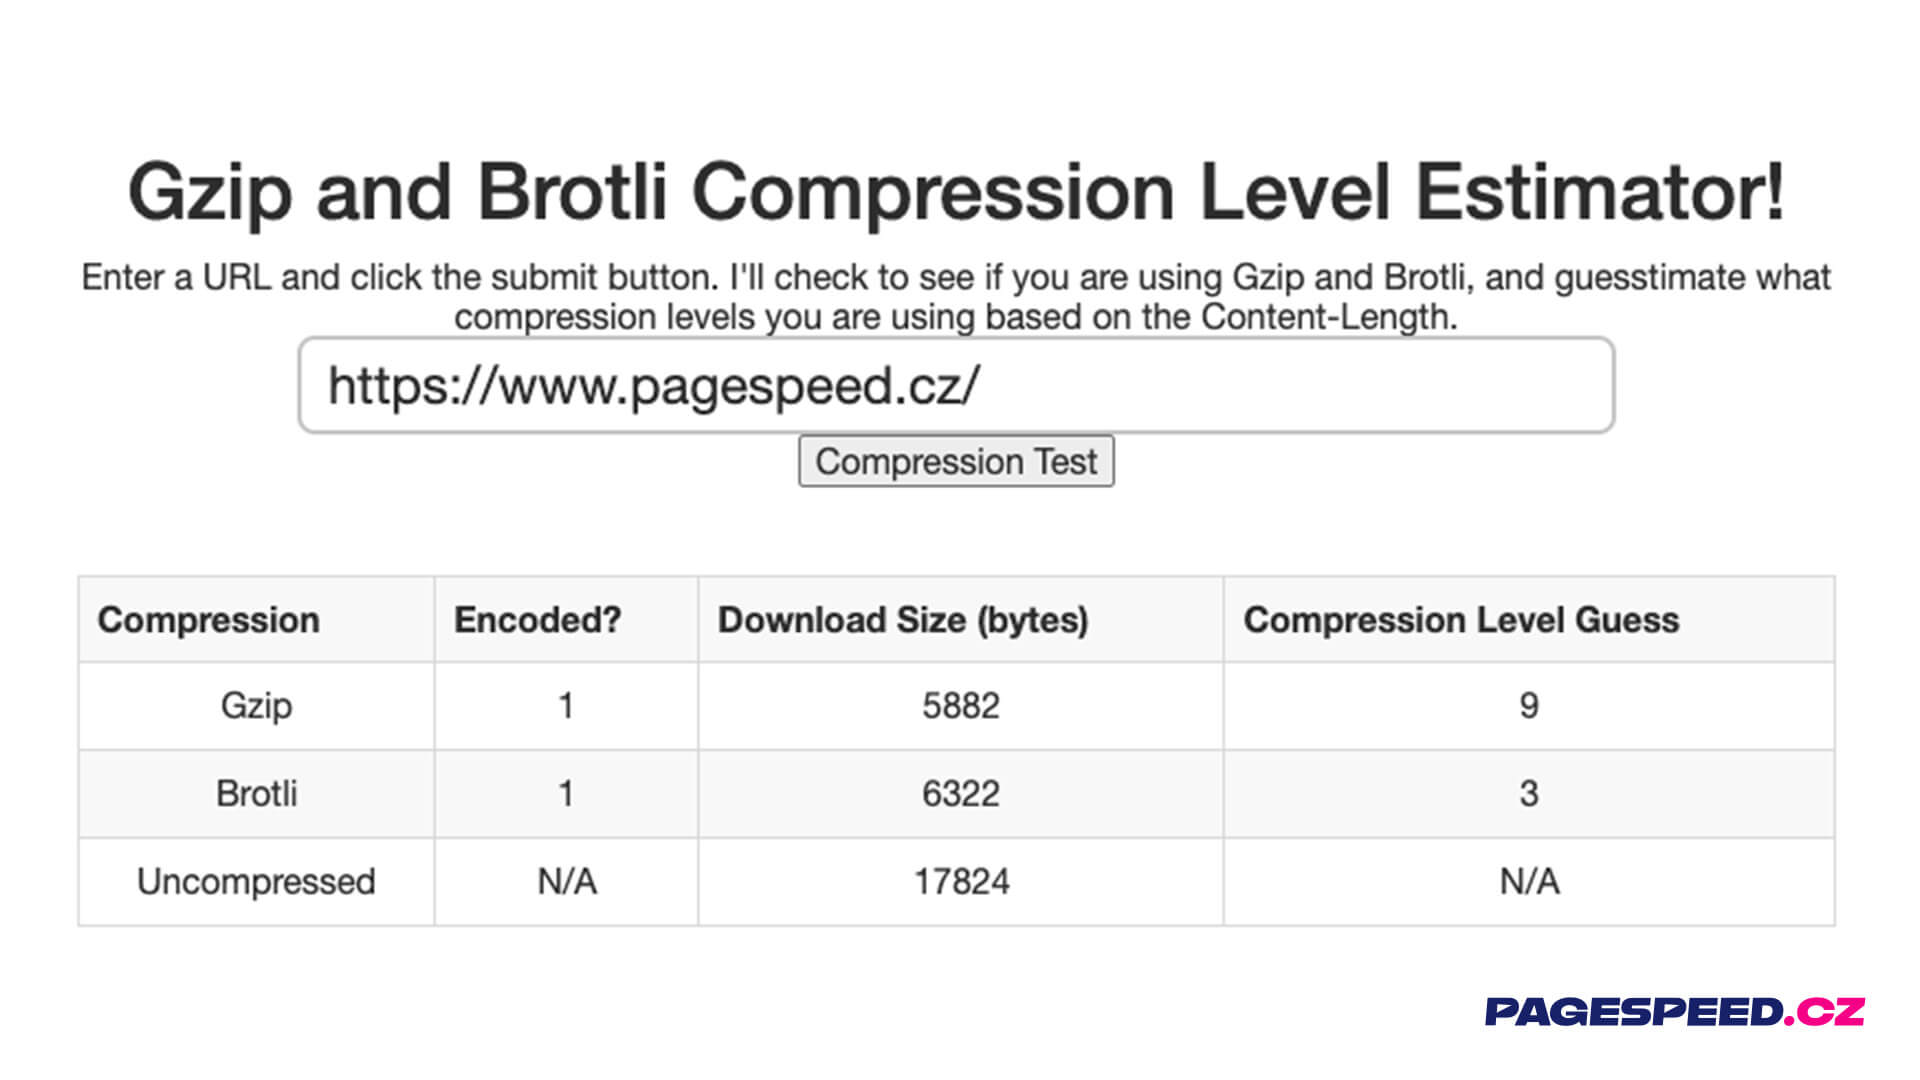 This tool reveals the compression level you have set.
Proper Compression Setup Isn't a Given
At PageSpeed.ONE, we conducted a survey of some of our clients' websites. The result showed that 6 out of 24 sites did not have the ideal compression level set.
Solving such a problem is not overly complicated. For GZIP, the compression level should be set by the person responsible for the infrastructure, someone from web hosting, or a skilled backend developer. The compression level is set at the APACHE level and involves a single line of code:
DeflateCompressionLevel 9
Simple, right? We handled such a change with one of our clients. HTML was initially set to GZIP LEVEL 1, which we had changed to LEVEL 6 after consultation.
The result? We achieved about a 22% reduction in HTML size (from 81 kB to 63 kB).
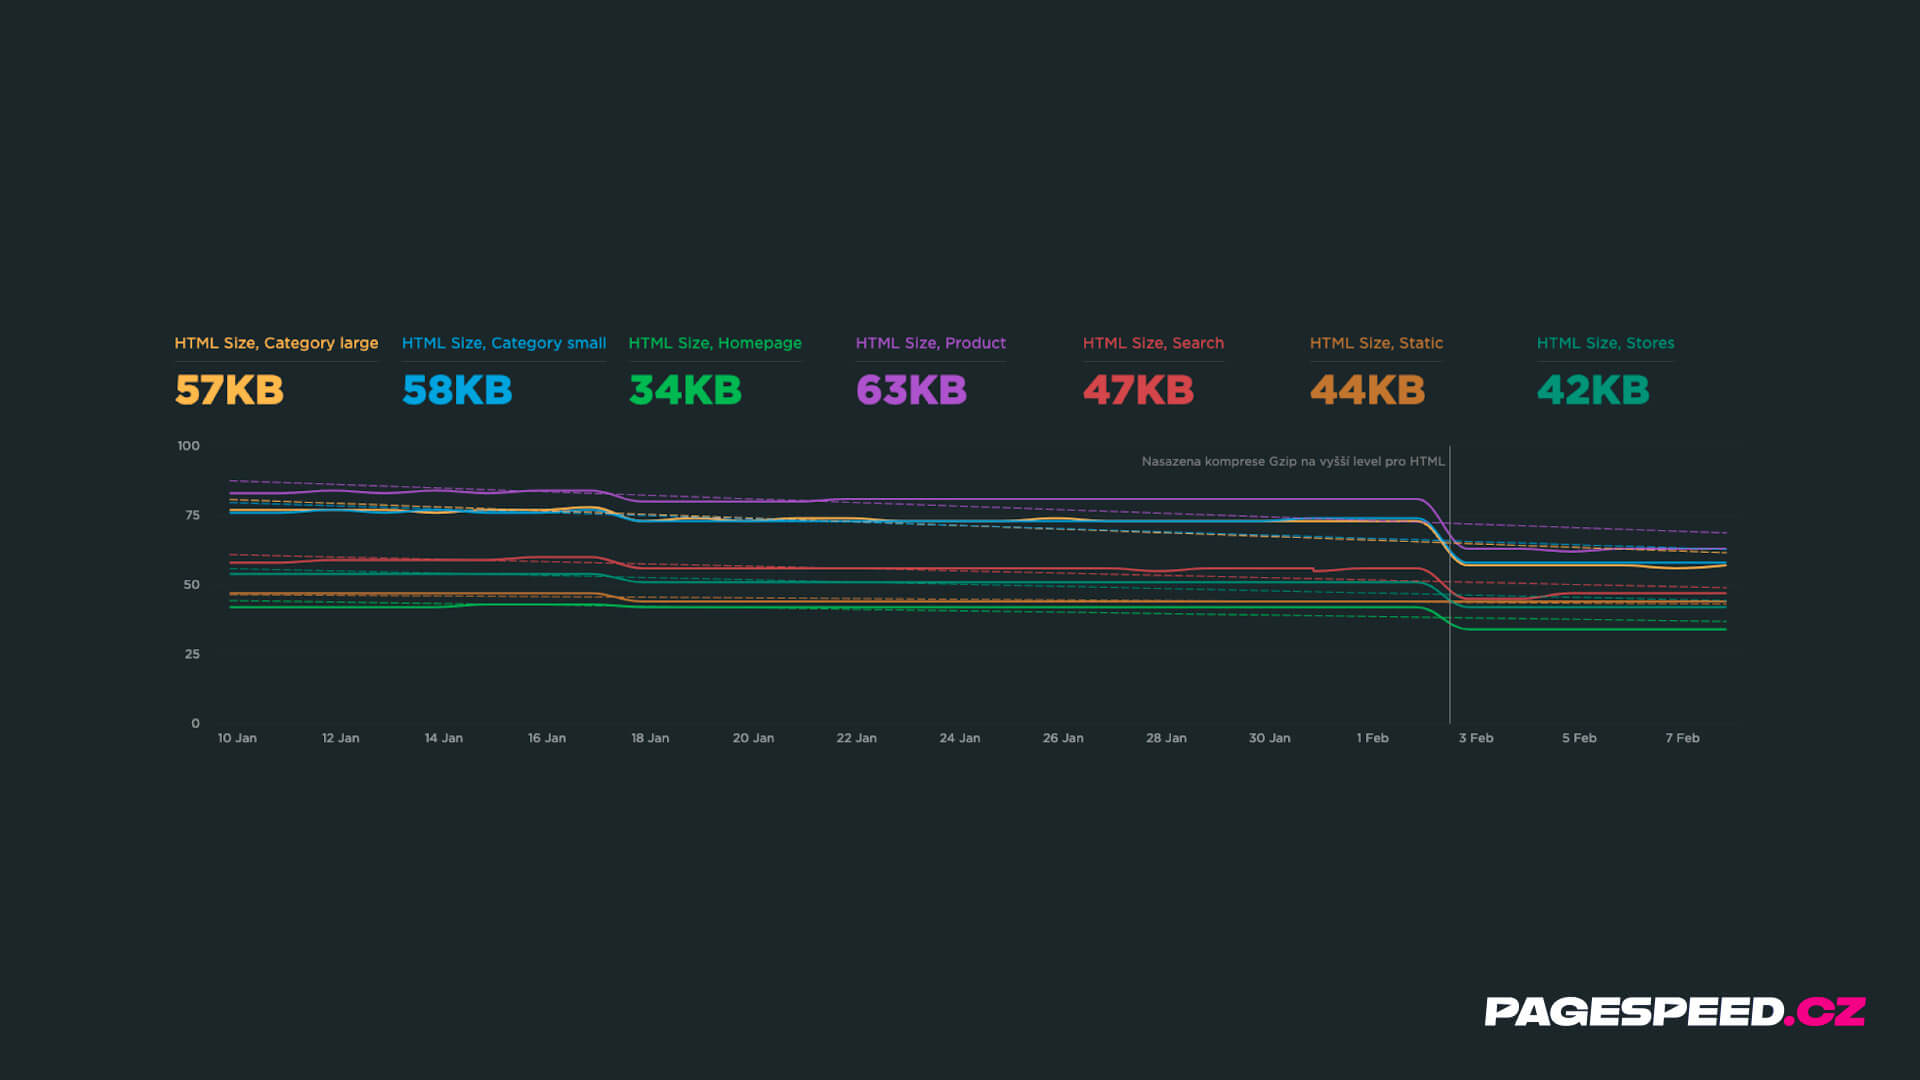 What happens to HTML data volume when a higher Gzip level is set.
We also discussed enabling Brotli compression, but it wasn't feasible. Although the newer algorithm ensures greater data savings, the page would actually load later for the user. Brotli compression takes more time, especially its “runtime” version, triggered only upon a server request.
Tip: Are you subscribed to our newsletter? Get tips every month on how to improve web speed.
It can also happen that for some reason, data compression fails entirely for a client.
Those big "humps" in the graph represent that. Whether you're downloading 600 kB or 100 kB of CSS makes a huge difference and is a reason to measure technical data and sizes on websites. These problems are then relatively easy to detect.
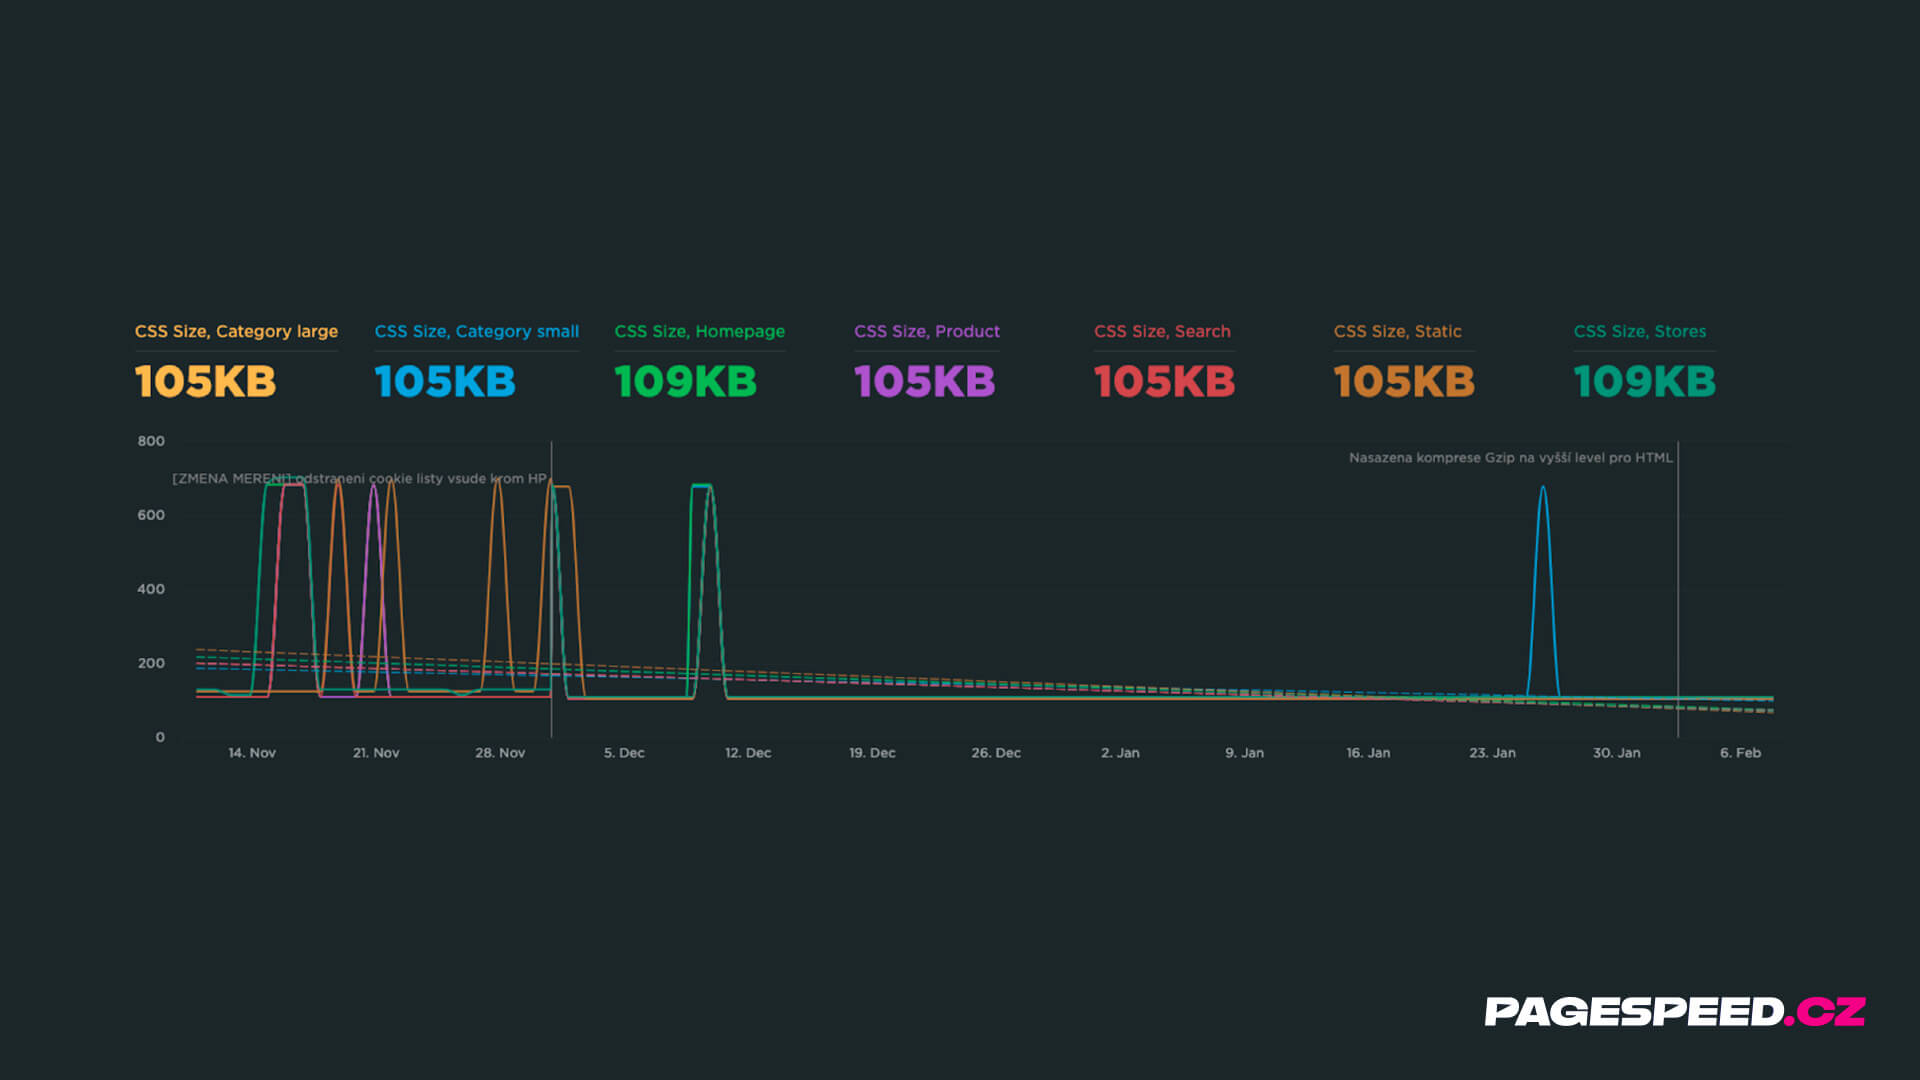 This is not what you want to see on a graph. When compression sometimes fails.
A Lifesaver for the Lazy: Cloudflare
Another way to address compression levels is to set the service Cloudflare for your domain. It will start caching your text files and apply the best possible compression. Specifically, Cloudflare directly enables Brotli for CSS, JS, SVG, etc.
If you use this service, you can check your settings. For some plans, Brotli needs to be enabled.
Cloudflare will be beneficial for you, even if your website runs on popular CMS platforms like WordPress, Shoptet, or Drupal.
Want to deploy Cloudflare on your site? Check out our Cloudflare setup service.
Summary
- Check your compression settings in DevTools (Network Tab), or in the Lighthouse tool.
- Generally, level 6 is recommended for compression.
- Levels higher than 6 do not bring significant file size differences.
- Fonts (WOFF and WOFF2) are already compressed.
- The higher the compression level, the higher the server performance and time demands.
- If you find a problem, reset the compression level.
- Cloudflare can automatically handle this for you.
Also, see how you can further assist with backend optimization.