WebP Images: Saving Precious Kilobytes
WebP is an image format developed by Google in 2010. Google designed WebP as a replacement for JPEG, PNG, and even animated GIF formats.
Using WebP can significantly enhance your website's performance without sacrificing image quality. Therefore, we recommend transitioning to WebP for all clients as a reliable bet.
The WebP format supports nearly everything we want from web images:
- Both lossy (like JPG) and lossless compression (like PNG).
- Transparency and semi-transparency (alpha channel like PNG).
- GIF-like animations.
WebP is so successful in optimizing data volume because it uses VP8 technology from video codecs. The result is far more efficient compression than older formats like JPG, PNG, or GIF.
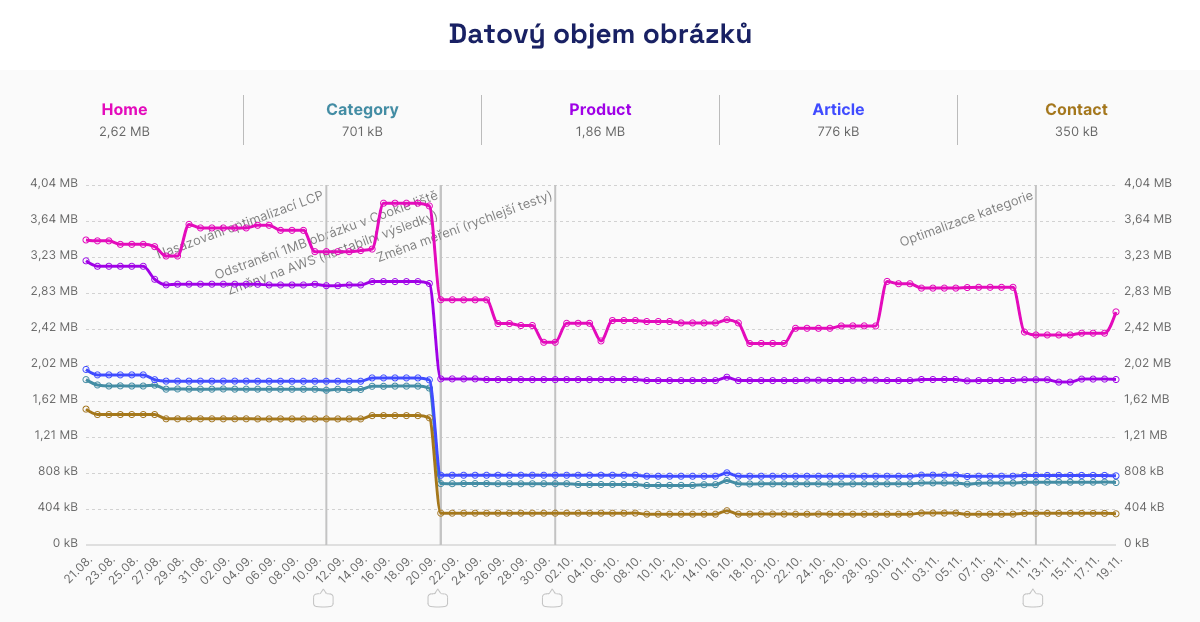 WebP can ensure such a visible reduction in image data volume. Source: Technical report in PLUS monitoring.
Why Use WebP?
Using WebP images enhances website speed:
- Faster Loading
WebP images are generally 25–34% smaller in data size than JPEG or PNG. This improves loading speed and hence the LCP metric. - Saves Data Transfer
Particularly appreciated by users on mobile devices with slower connections. - Compatibility
WebP is supported across all major browsers, including Safari (from version 14). No need for fallback solutions.
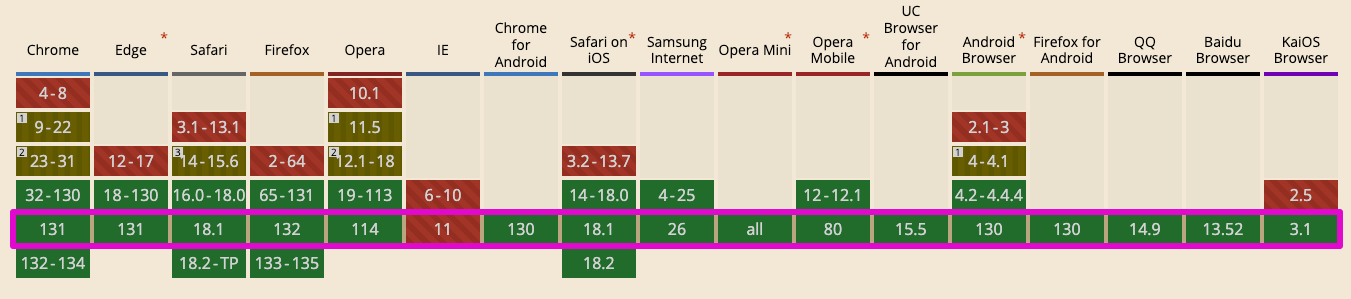 WebP format support according to CanIUse. Fortunately, Internet Explorer is a thing of the past.
How to Implement WebP on Your Website
The ideal solution is to automate the process and insert correctly compressed images into the website. There are several ways to insert WebP images:
- Automatic Conversion to WebP
Use tools like cwebp, ImageMagick, and similar libraries for generating images on your own server. After uploading an image through the administration or upon import, it compresses into the appropriate format and quality. Compression can also occur on demand. The image is created only with the first browser request, but this will be slower. - Enable WebP Support in the Cloud
Most modern cloud solutions, like Cloudflare, support conversion to WebP. Most also handle the newer AVIF format, which, however, doesn't yet have as broad support. The advantage is that you don't have to deal with space on your server, and the cloud selects the most optimal format for you. - Manual Conversion to WebP
For smaller static websites, manually compress images to WebP using tools like Squoosh or simply in Photoshop.
Our Experience: How to Set Quality?
Setting compression quality parameters can be challenging, which is why we share our experiences from web speed consulting.
Compression settings can vary depending on the use of images on the website. Let's illustrate some examples:
- In product thumbnails on category listings for e-commerce sites, a quality of 70-80% often suffices.
- If you sell cameras and want to showcase true photo quality, it's wise to set WebP quality to 85-90%.
We always recommend dedicating some time to setting compression. At a minimum, two steps are necessary:
- Testing
Take several typical photos for your site. Experiment with tools like TinyPNG or Squoosh and observe the balance of quality and file size. - Choosing the Optimal Quality Level
A quality of 70 - 90% is recommended for lossy compression. Lossless images are suitable for graphics with sharp edges (formerly used as PNG) or detailed photographs.
Final tip: Always monitor the data volume of images. Our experience shows that even changing a single image, such as on a website's homepage, can cause unpleasant fluctuations in site speed:
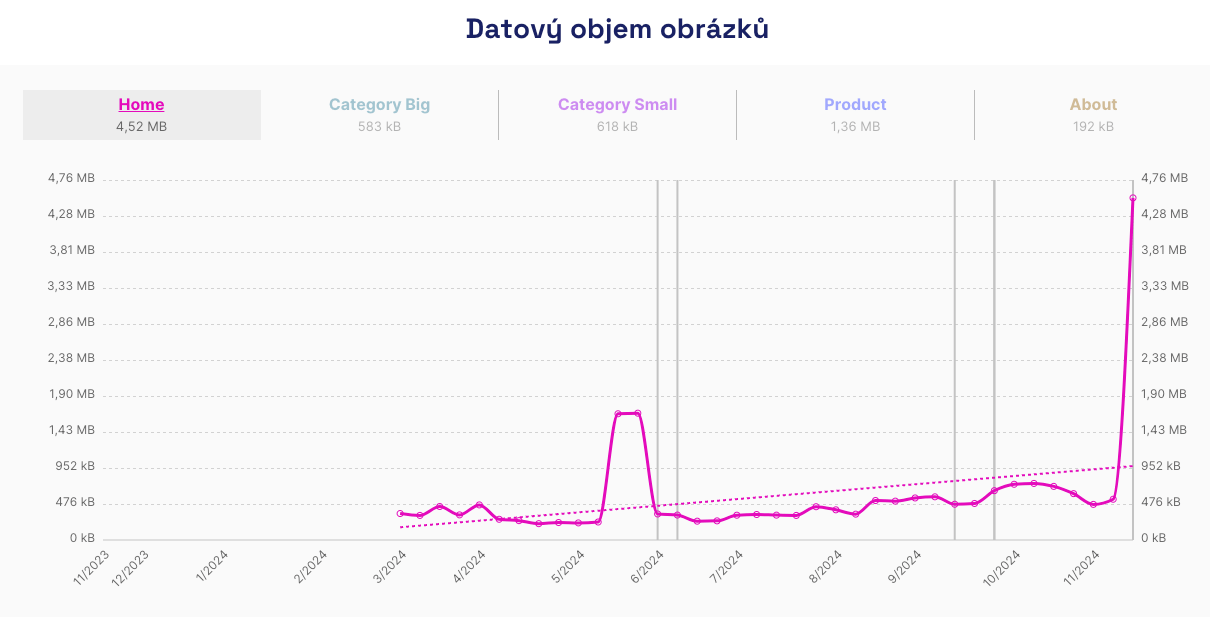 Timely detection of an issue caused by inserting a 4 MB image on the homepage. Source: Technical report in PLUS monitoring.
Here you'll find more tips for optimizing images on your website. If you already use WebP and want to push optimization further, check out the article on the AVIF format, which offers even better compression.